
Getting started with vulnhub
Getting Setup with vulnhub using VirtualBox
Vulnhub is a site to find practice server setups that you can practice with locally. These are usually marked with a difficulty level, most have walkthroughs if you get stuck and they’re completely legal. Because Windows virtual machines would require licenses, Linux hosts are mainly what you’ll find, but they’re the dominant presence on the internet so that’s completely fine.
What are Virtual machines?
A virtual machine is simply like having a second computer hosted (virtually) on your own. When using vulnhub, we will be using two virtual machines; The Kali machine where you’ll be attacking from, and the victim machine which you’ll download from vulnhub. Because these are separate machines running on the same hardware, they’ll all share your RAM and CPU so depending on your machine you might need to add or remove their allocation of RAM and close any intensive applications.
After you’ve finished each machine it’s good to have a look at a few walkthroughs to see if there were other ways of doing it, but when you’re finally done it’s best to delete both the machine and the file you downloaded to create it, simply because they can build up to take up so much hard drive space.
In this post we will be looking at VirtualBox, a free program for running your virtual machines (or “VMs”)
Installing VirtualBox
Ok so let’s get set up. Before we do anything on vulnhub itself, we’ll install VirtualBox. You can find the downloads page HERE, simply choose the OSX or Windows install depending on your OS, then install as normal.
Setting up a NAT Network
Because we’re about to host a vulnerable machine that is out of date and misconfigured (ie completely insecure) it’s bad practice to have it visible to the outside internet, if you want to practice at work over a lunch hour then it’d almost certainly violate any security policies in place. So what we’ll do is make a little internal network using VirtualBox so the machines can see the internet and each other but are safely hidden away from the outside world.
Within VirtualBox, go to the preferences menu and select “Network”. Click the green plus icon (All of these screenshots are from a mac but they should be close enough for Windows users) and give it a name and make a note of the number in the box underneath (This is the range of IP addresses your virtual machines will be given):

Installing Kali
The next thing we’ll do is install Kali Linux. Kali is derived from Debian (A flavour of Linux) and is essentially an operating system that comes bundled with a wide variety of the tools and wordlists we’ll be using for our hacking.
All of these are available separately but it’s convenient having them all setup already in one place.
Click HERE to download the Kali image. Once downloaded, Either double click on it to open with VirtualBox or open from within VirtualBox by using file/import appliance.
Once it has finished importing, click on the Kali entry on the left hand side, click on settings, then the network tab of VirtualBox and assign its network to the NAT Network you set up earlier which should now be present on the dropdown options:

Now click the entry on the left hand side for Kali and click “start”. Kali will boot up and you’ll watch it loads in a window like a normal computer. the username is root and the password is toor.
Now’s a good time to update your Kali since it may be a bit behind. You can enter this into a command terminal:
apt-get update && apt-get upgrade
Installing your Vulnhub VM
Choose a virtual machine off vulnhub (if you don’t care which you get, THIS post contains a walkthrough for a beginner-friendly machine, the link to download which is at the top of the page)
Download the .ova and install it like you did with Kali; import the appliance and set it to the Nat Network we set up earlier.
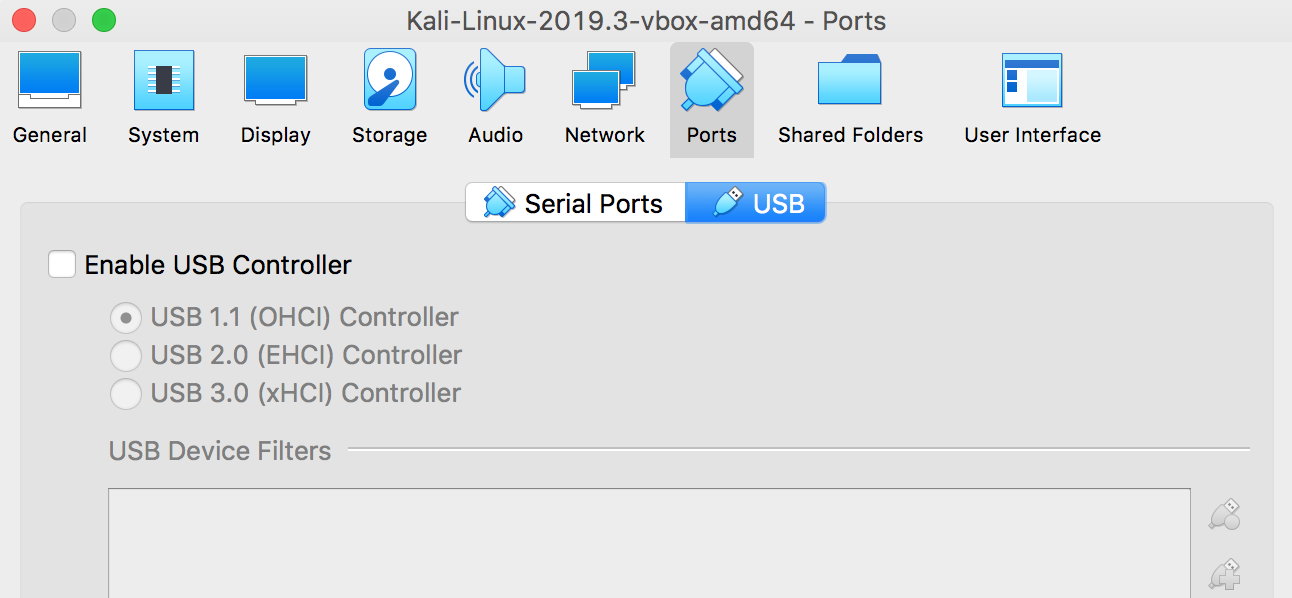
One thing to remember with a lot of vulnhub VMs is that they may error sometimes with some USB setting so I always disable it before I even start the thing. Click the entry for the new VM, click settings, then ports, then USB and disable it:
Finding the Vulnhub VM on your NAT network
Some machines are very nice and tell you their IP address when they boot up, but most won’t, so we have to find it ourselves.
In a kali terminal, type:
ifconfig
This will tell you Kali’s IP address. (depending on the address you noted earlier when creating the NAT Network it might start with 10.0.2.x)
Next we run an nmap scan to give us the IP of every machine of our network, which will be pretty quick as we only have Kali and the Vulnhub VM on it.
nmap 10.0.2.0/24
(Or whatever the number was that you recorded earlier)
There may be some junk in there, but the entry we’re looking for will usually end in Oracle VirtualBox virtual NIC and has the IP address that isn’t Kali’s.
After that, if port 80 is open then open your browser and type in the machine’s IP address into your address bar and you’re now at the starting point to tackling the machine.